A squeaky ironing press handle can disrupt a simple chore. This grating noise often signals underlying mechanical friction or wear, but many common causes can be resolved with a few simple DIY steps. By identifying the root cause, gathering essential tools like screwdrivers and appropriate lubricants (such as sewing machine oil or high-temperature lithium grease), and following a systematic repair process, you can quickly silence the squeak and restore smooth operation to your appliance, saving on professional repair costs.
This guide will walk you through identifying the root cause, gathering tools, and executing a step-by-step fix. You’ll also learn about choosing the right lubricants and adopting preventative maintenance habits to ensure your ironing press operates quietly and effectively for years to come.
Understanding Your Squeaky Ironing Press Handle: Why the Noise?
A squeaky ironing press handle is more than just an annoyance; it’s often a symptom of mechanical friction or wear. The most common culprits behind that irritating noise include loose screws or bolts, which allow components to rub against each other, or a lack of proper lubrication on moving parts. Over time, dust, lint, and old, dried-up grease can accumulate within the handle mechanism, creating abrasive contact points.
Ignoring a squeak can lead to further issues, such as increased wear on critical components, reduced pressing efficiency, or even eventual breakage of the handle. Addressing the problem promptly not only restores peace to your laundry routine but also extends the lifespan of your valuable appliance. Understanding these common causes is the first step toward a successful DIY repair.
Essential Tools and Materials for a Quick DIY Fix
Before you begin, gather the following tools and materials to ensure a smooth and efficient repair process. Having everything on hand will prevent interruptions and make the job quicker.
- Screwdriver Set: You’ll likely need Phillips-head and possibly a star-head screwdriver, depending on your ironing press model, to access the handle’s internal components.
- Allen Wrenches: Some models may use Allen (hex) bolts for assembly, so a set of these is beneficial.
- Clean Cloths or Rags: Essential for cleaning away old grease, dust, and wiping up excess lubricant.
- Degreaser (Optional but Recommended): For thoroughly cleaning old, gummy residue from metal parts.
- Appropriate Lubricant: This is crucial. Suitable options include:
- Sewing Machine Oil or 3-in-1 Oil: Excellent for general lubrication of moving metal parts, shafts, and threaded posts.
- High-Temperature Lithium Grease: Ideal for areas with more friction and heat, such as pistons and rods found in the pressing mechanism.
- Silicone Spray ( sparingly, in specific cases): Can be used for plastic-on-plastic friction, but ensure it’s heat-safe and doesn’t degrade plastic. Avoid on areas with direct heat.
Always prioritize safety by ensuring your ironing press is unplugged and completely cool before attempting any repairs.
Step-by-Step Guide: Silencing Your Ironing Press Handle
Fixing a squeaky handle is a straightforward process if you approach it systematically. Follow these steps to diagnose and resolve the issue with confidence.
1. Safety First
|
Our Picks for the Best Ironing Press in 2026
As an Amazon Associate I earn from qualifying purchases.
|
||
| Num | Product | Action |
|---|---|---|
| 1 | DRFLASH 2-in-1 Steamer & Iron for Clothes,15s Fast Heat-up 1200W Portable Handheld Garment Steamer,Travel Size with Large Ceramic Heat Panel,Quick Wrinkle Removal,110V-120V |

|
| 2 | BLACK+DECKER Easy Steam Compact Iron for Clothes, Automatic Shutoff, Nonstick Plate, Light Weight, 1200 Watts |
|
| 3 | Cricut EasyPress Mini Heat Press - for Pressing Small Objects Like Shoes, Stuffed Animals, Hats & More - 3 Heat Settings & Precision Tip - Ceramic-Coated Heat Plate - Compact & Lightweight - Zen Blue |
|
| 4 | Cricut EasyPress Mini™ LT - Mint Green - Mini Heat Press for Pressing Shoes, Baby Clothes, T-Shirts, & More - Easy to Use with a Single Setting - Precision Tip - Compact & Portable Mini Iron |
|
| 5 | BLACK+DECKER Press & Steam 2-in-1 Iron and Steamer, 180% More Steam & One Temperature Technology, Ceramic Soleplate, Safe on All Fabric Types |
|
| 6 | Calogy Mini Heat Press, Heat Transfer Machine, Constant Temp Control, Insulated Safety Base, Fits for Crafts, T-Shirt, Hat, Cap, Pillows(White Pink) |
|
| 7 | Steamfast SF-680 Digital Steam Press with Multiple Fabric Settings and Steam Burst Function,Stainless/Black |
|
| 8 | HTVRONT Heat Press Mini Heat Press Machine, Small Heat Press Portable Iron Press Machine for T Shirts, Hats, Heating Transfer Projects (Mint) |
|
| 9 | The Quilted Bear Mini Steam Iron - Lightweight Mini Travel Iron for Effortless Quilting & Wrinkle-Free Clothes with Hard Shell Case - Travel Steamer Craft Press for Clothes & Crafts (Black) |
|
| 10 | Steamfast SF-623 Mid-Size Steam Press with Multiple Fabric Settings and Steam Burst Function, Black, 20.47" L x 17.16" W x 6.73" H |
|
Always begin by ensuring the ironing press is unplugged from the power outlet and has completely cooled down. This prevents accidental burns or electrical shock during the repair. Safety should always be your top priority when working with electrical appliances.
2. Initial Inspection
Carefully examine the handle and its connection points to the main body of the press. Operate the handle gently to pinpoint the exact source of the squeak. Listen for where the noise originates, and look for any visible signs of wear, rust, loose screws, or debris. Pay close attention to pivot points, springs, and any joints where metal might rub against metal or plastic. Sometimes, a stiff locking lever can also contribute to a squeaking sound, which can be eased by gently moving the handle up and down while operating the lever.
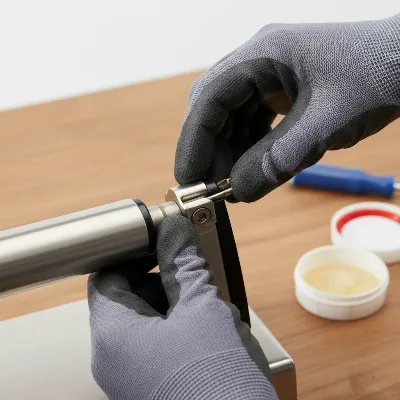 A person inspecting the handle and pivot points of an unplugged ironing press for loose screws and friction areas, with a screwdriver nearby on a workbench.
3. Clean the Mechanism
Once you’ve identified the problematic area, use a clean cloth or a small brush to remove any accumulated dust, lint, old dried grease, or other debris. For stubborn grime, a degreaser can be applied to metal parts, followed by a thorough wipe-down. Cleanliness is key, as old contaminants can hinder lubrication and cause new squeaks.
4. Tighten Loose Connections
Using the appropriate screwdriver or Allen wrench, carefully tighten any loose screws, bolts, or nuts around the handle assembly. Be firm but gentle; over-tightening can strip threads or damage plastic components. Often, a squeak is simply the result of a slightly loosened fastener allowing components to move improperly.
5. Apply the Right Lubricant
This is where your chosen lubricant comes in. Apply a small amount of lubricant directly to the pivot points, shafts, springs, and any other areas where you observed friction or heard the squeak.
- For threaded posts, smaller shafts, and general moving metal parts, a few drops of sewing machine oil or 3-in-1 oil are typically effective.
- For pistons, rods, or heavily used joints that experience more pressure and potential heat (common in some heat press designs), high-temperature lithium grease is a better choice for its longevity and heat resistance. Apply it with a cotton swab or a rag.
After applying, gently work the handle up and down several times to distribute the lubricant evenly.
6. Test and Reassemble
Once lubricated, test the handle’s movement. It should operate smoothly and silently. If the squeak persists, re-inspect the area to ensure you haven’t missed any friction points. Once satisfied, reassemble any parts you removed, making sure all fasteners are securely tightened. Wipe away any excess lubricant from the exterior of the press with a clean rag to prevent dust attraction.
Choosing the Right Lubricant for Longevity
The type of lubricant you choose significantly impacts the effectiveness and longevity of your repair. Not all lubricants are created equal, especially when dealing with an appliance that generates heat like an ironing press.
- Sewing Machine Oil / 3-in-1 Oil: These multi-purpose oils are excellent for light to moderate lubrication. They penetrate well into tight spaces and are suitable for pivot points, threaded posts, and smaller metal shafts. Their advantage lies in their accessibility and general utility. However, they might require more frequent reapplication in high-friction or high-heat areas.
- High-Temperature Lithium Grease: This is a superior choice for parts under more stress or exposed to moderate heat, such as the pistons and rods in the pressing mechanism. Lithium grease provides a thicker, more durable film of lubrication that lasts longer and withstands wear better. It’s particularly recommended for the main articulating joints of the press.
- Silicone Spray: While silicone lubricants are great for plastic-on-plastic friction, use them cautiously on an ironing press. Ensure the product is heat-safe and won’t degrade any plastic components if applied to areas that might get warm. It’s generally less suitable for metal-on-metal components under high pressure or heat.
- What to Avoid: Steer clear of petroleum-based oils not specifically designed for such applications, as they can sometimes damage certain plastics or attract excessive dust. Also, while WD-40 can act as a penetrant to loosen stuck parts, it’s not a long-lasting lubricant and may need to be followed by a more suitable product for sustained silence.
Choosing the correct lubricant ensures the repair lasts, keeping your ironing press handle operating quietly and smoothly.
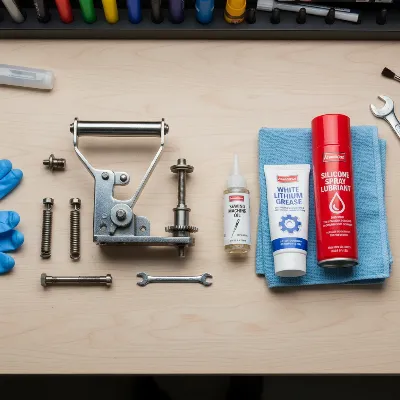 Various lubricants (sewing machine oil, lithium grease, silicone spray) on a workbench next to an ironing press, illustrating the choice for different applications.
Preventative Care: Keeping Your Handle Squeak-Free
Maintaining a silent and smoothly operating ironing press handle extends beyond a one-time fix. Incorporating regular preventative care into your routine can significantly reduce the likelihood of future squeaks and ensure the longevity of your appliance.
Firstly, regular cleaning is paramount. Dust, fabric fibers, and other debris can accumulate in the handle’s moving parts, eventually causing friction. A quick wipe-down with a clean cloth after each use, focusing on the joints and pivot points, can prevent buildup. Periodically, perform a more thorough cleaning to remove any hidden grime that might be contributing to stiffness or noise.
Secondly, periodic lubrication is vital. Depending on how frequently you use your ironing press, consider re-lubricating the key friction points once or twice a year. Even if no squeaks are present, a fresh application of the appropriate lubricant (e.g., sewing machine oil for lighter parts, lithium grease for heavier mechanisms) can keep everything moving freely. This proactive approach ensures components remain well-protected against wear.
Lastly, gentle operation can make a difference. Avoid forcing the handle or slamming it down, as this can put undue stress on the joints and fasteners, accelerating wear and loosening components. By integrating these simple habits, you can keep your ironing press handle squeak-free and extend the life of your machine, ensuring it’s always ready for quiet, efficient use.
Conclusion
A squeaky ironing press handle is a common but easily solvable problem for any DIY enthusiast. By understanding the causes, gathering the right tools, and meticulously following the steps of inspection, cleaning, tightening, and lubricating, you can restore your appliance to its smooth, silent operation. Opting for the correct high-temperature lubricants and incorporating routine preventative maintenance will not only silence the immediate noise but also safeguard your ironing press against future issues, enhancing its durability and your ironing experience. Embrace these simple solutions to enjoy the quiet efficiency you deserve.
Are you ready to silence that squeak and bring tranquility back to your ironing tasks?
Frequently Asked Questions
How often should I lubricate my ironing press handle?
The frequency depends on usage. For average household use, lubricating once a year is generally sufficient. If you use your ironing press very frequently or notice stiffness returning, you might consider lubricating every six months to maintain optimal performance.
Can I use any household oil to fix a squeaky handle?
It’s best to use lubricants specifically recommended for appliances or high-temperature applications, such as sewing machine oil, 3-in-1 oil, or high-temperature lithium grease. Avoid cooking oils or other non-specialized oils, as they can become gummy, attract dust, or degrade certain materials over time, potentially causing more issues.
What if my ironing press handle is squeaking and also feels loose?
If the handle is both squeaking and feeling loose, the primary issue is likely loose fasteners. Start by thoroughly inspecting and tightening all screws, bolts, and nuts around the handle mechanism. Once tightened, if the squeak persists, then proceed with cleaning and lubrication as described in the guide.
Is it normal for an ironing press to make some noise?
While some subtle mechanical sounds might be normal, a persistent or loud squeaking noise usually indicates friction that can be resolved. Modern ironing presses are designed for relatively quiet operation, so any noticeable squeak is generally a sign that lubrication or tightening is needed.
What if the squeak doesn’t go away after lubrication and tightening?
If the squeak persists after following all the steps, it might indicate more significant wear or damage to an internal component, such as a worn-out spring or a damaged pivot point. In such cases, further disassembly might be required, or it may be time to consult a professional appliance technician.
Frequently Asked Questions
How often should I lubricate my ironing press handle?
For average household use, lubricating your ironing press handle once a year is generally sufficient. If you use the press very frequently or notice stiffness returning, consider lubricating every six months to maintain optimal performance and prevent squeaks.
Can I use any household oil to fix a squeaky handle?
It is best to use lubricants specifically recommended for appliances or high-temperature applications, such as sewing machine oil, 3-in-1 oil, or high-temperature lithium grease. Avoid cooking oils or other non-specialized oils, as they can become gummy, attract dust, or degrade certain materials over time, potentially causing more issues.
What if my ironing press handle is squeaking and also feels loose?
If the handle is both squeaking and feeling loose, the primary issue is likely loose fasteners. Start by thoroughly inspecting and tightening all screws, bolts, and nuts around the handle mechanism. Once tightened, if the squeak persists, then proceed with cleaning and lubrication as described in the guide.
Is it normal for an ironing press to make some noise?
While some subtle mechanical sounds might be normal, a persistent or loud squeaking noise usually indicates friction that can be resolved. Modern ironing presses are designed for relatively quiet operation, so any noticeable squeak is generally a sign that lubrication or tightening is needed to restore smooth function.
What if the squeak doesn't go away after lubrication and tightening?
If the squeak persists after following all the steps, it might indicate more significant wear or damage to an internal component, such as a worn-out spring or a damaged pivot point. In such cases, further disassembly might be required, or it may be time to consult a professional appliance technician for a more in-depth assessment.
How to Fix a Squeaky Ironing Press Handle
Follow these steps to diagnose and resolve a squeaky ironing press handle, restoring smooth and quiet operation to your appliance.
Always begin by ensuring the ironing press is unplugged from the power outlet and has completely cooled down. This prevents accidental burns or electrical shock during the repair, making safety your top priority when working with electrical appliances.
Carefully examine the handle and its connection points to the main body of the press. Operate the handle gently to pinpoint the exact source of the squeak, looking for visible signs of wear, rust, loose screws, or debris at pivot points and joints.
Once the problematic area is identified, use a clean cloth or small brush to remove any accumulated dust, lint, or old dried grease. For stubborn grime, apply a degreaser to metal parts, followed by a thorough wipe-down, as cleanliness is key for effective lubrication.
Using the appropriate screwdriver or Allen wrench, carefully tighten any loose screws, bolts, or nuts around the handle assembly. Be firm but gentle to avoid stripping threads or damaging plastic components, as a squeak often results from slightly loosened fasteners.
Apply a small amount of the chosen lubricant (e.g., sewing machine oil for light parts, high-temperature lithium grease for heavy joints) directly to pivot points, shafts, springs, and other friction areas. Gently work the handle up and down several times to distribute the lubricant evenly for smooth operation.
