Cleaning a steam ironing press safely at home involves regularly descaling the water tank with a 50:50 white vinegar and distilled water solution, meticulously cleaning the soleplate with baking soda paste, and clearing steam vents with cotton swabs. This routine maintenance, performed every 3-6 months depending on usage and water hardness, ensures optimal performance, prevents fabric stains, and extends the appliance’s lifespan, far surpassing the capabilities of a traditional iron for many tasks.
Understanding Your Steam Ironing Press: Why Clean It?
A steam ironing press typically features a large heated soleplate that clamps down onto a padded board, applying heat and steam to smooth out fabrics. This design offers superior efficiency and larger coverage compared to handheld irons. Yet, this constant interaction with water and textiles makes it susceptible to various forms of buildup. The most common culprits include limescale, which are mineral deposits left by tap water, and fabric residue or scorch marks on the soleplate from synthetic materials or starch.
Ignoring these issues can lead to several problems: steam vents may clog, causing the press to spit dirty water or lose steam power. A sticky or rough soleplate can drag across fabrics, leading to new wrinkles or even damaging delicate items. A neglected ironing press becomes less efficient, making your chores harder and potentially shortening the appliance’s life. Regular cleaning is not just about aesthetics; it’s about maintaining optimal performance and protecting your wardrobe.
Essential Tools and Safety Precautions
Before embarking on any cleaning task for your steam ironing press, gathering the right tools and adhering to crucial safety measures is paramount. You’ll likely find most of the necessary items already in your home.
Tools and Materials Needed:
- White Vinegar: An excellent natural descaler and cleaner.
- Distilled Water: Ideal for diluting vinegar and rinsing, especially in hard water areas.
- Baking Soda: A gentle abrasive for stubborn soleplate stains.
- Mild Dish Soap: For cleaning exterior surfaces.
- Soft Cloths/Microfiber Towels: For wiping and buffing, avoiding scratches.
- Cotton Swabs: Perfect for cleaning intricate areas like steam vents and crevices.
- Non-Gel Toothpaste: Surprisingly effective for soleplate residue.
- Old Towel or Scrap Fabric: For testing after cleaning and protecting surfaces during descaling.
- Heat-Resistant Gloves (Optional but Recommended): For tasks involving a slightly warm soleplate.
Crucial Safety Precautions:
- Always Unplug: Before you begin any cleaning, ensure your ironing press is unplugged from the power outlet. This eliminates any risk of electrical shock.
- Allow to Cool Completely: The soleplate and internal components can retain heat for a long time. Always let the press cool down fully to prevent burns.
- Never Immerse in Water: Steam ironing presses are electrical appliances. Submerging them in water can cause severe damage and create electrical hazards.
- Check Your Manual: Your ironing press’s manufacturer’s manual may contain specific cleaning instructions or warnings, especially regarding descaling methods. Always consult it first.
Step-by-Step Guide to Cleaning Your Ironing Press
Maintaining a clean steam ironing press involves addressing its various components: the exterior, the soleplate, the steam vents, and the internal water tank. Each part requires a specific approach to ensure a thorough and safe clean.
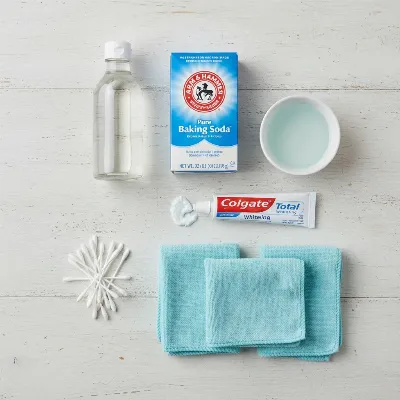 Essential cleaning supplies for a steam ironing press, including vinegar, baking soda, and soft cloths.
Cleaning the Exterior
|
Our Picks for the Best Ironing Press in 2026
As an Amazon Associate I earn from qualifying purchases.
|
||
| Num | Product | Action |
|---|---|---|
| 1 | Cricut EasyPress Mini™ LT - Mint Green - Mini Heat Press for Pressing Shoes, Baby Clothes, T-Shirts, & More - Easy to Use with a Single Setting - Precision Tip - Compact & Portable Mini Iron |

|
| 2 | Calogy Mini Heat Press, Heat Transfer Machine, Constant Temp Control, Insulated Safety Base, Fits for Crafts, T-Shirt, Hat, Cap, Pillows(White Pink) |
|
| 3 | Steamfast SF-623 Mid-Size Steam Press with Multiple Fabric Settings and Steam Burst Function, Black, 20.47" L x 17.16" W x 6.73" H |
|
| 4 | The Quilted Bear Mini Steam Iron - Lightweight Mini Travel Iron for Effortless Quilting & Wrinkle-Free Clothes with Hard Shell Case - Travel Steamer Craft Press for Clothes & Crafts (Black) |
|
| 5 | BLACK+DECKER Easy Steam Compact Iron for Clothes, Automatic Shutoff, Nonstick Plate, Light Weight, 1200 Watts |
|
| 6 | BLACK+DECKER Press & Steam 2-in-1 Iron and Steamer, 180% More Steam & One Temperature Technology, Ceramic Soleplate, Safe on All Fabric Types |
|
| 7 | DRFLASH 2-in-1 Steamer & Iron for Clothes,15s Fast Heat-up 1200W Portable Handheld Garment Steamer,Travel Size with Large Ceramic Heat Panel,Quick Wrinkle Removal,110V-120V |
|
| 8 | Cricut EasyPress Mini Heat Press - for Pressing Small Objects Like Shoes, Stuffed Animals, Hats & More - 3 Heat Settings & Precision Tip - Ceramic-Coated Heat Plate - Compact & Lightweight - Zen Blue |
|
| 9 | Steamfast SF-680 Digital Steam Press with Multiple Fabric Settings and Steam Burst Function,Stainless/Black |
|
| 10 | HTVRONT Heat Press Mini Heat Press Machine, Small Heat Press Portable Iron Press Machine for T Shirts, Hats, Heating Transfer Projects (Mint) |
|
The exterior of your ironing press can accumulate dust, grime, and fingerprints over time. Keeping it clean ensures a professional appearance and hygienic use.
- Preparation: Ensure the press is unplugged and completely cool.
- Damp Wipe: Lightly dampen a soft cloth with a mixture of warm water and a few drops of mild dish soap. Wring out the cloth thoroughly so it’s only damp, not dripping wet.
- Wipe Down: Gently wipe down all exterior surfaces, including the housing, handle, and control panel. Avoid getting moisture into any electrical openings.
- Detailing Crevices: Dip a cotton swab in the soapy solution and use it to clean around buttons, dials, and in any small crevices where dirt might hide.
- Dry Thoroughly: Follow up with a clean, dry microfiber cloth to remove any soap residue and ensure all surfaces are completely dry before storing or using the press again.
Tackling the Soleplate (The Iron’s Face)
The soleplate, the large heating surface that contacts your fabrics, is prone to sticky residue, scorch marks, and general grime. Its material often dictates the best cleaning method.
- General Cleaning and Light Stains: For everyday dust and light marks, simply dampen a soft cloth with white vinegar and wipe down the cool soleplate.
- Sticky Residue and Scorch Marks: These require more focused attention.
- Baking Soda Paste: Combine two tablespoons of baking soda with one tablespoon of distilled water to form a thick paste. Spread this paste over the affected areas on a cool soleplate. Allow it to sit for a few minutes, then gently scrub with a damp cloth or a non-metallic sponge. Wipe clean with a fresh damp cloth and dry thoroughly. For stubborn spots, a mix of baking soda and white vinegar can be even more effective.
- Toothpaste Method: Apply a small amount of white, non-gel toothpaste directly onto a cool soleplate. Rub it gently with a soft cloth, then wipe clean. Follow with a damp cloth to remove any residue.
- Salt and Aluminum Foil (for Sticky Grime): Place a sheet of aluminum foil on your ironing board and sprinkle a layer of coarse salt over it. With the iron slightly warm (unplugged for safety, or on lowest setting), run it over the salt several times. The salt acts as a gentle abrasive to lift sticky residue. Wipe clean once cool.
- Dryer Sheets: For light residue, rub a fresh dryer sheet over a slightly warm soleplate. The fabric softener residue can help lift grime. After, iron over an old towel to remove any lingering dryer sheet fibers.
- Magic Eraser or Soft Scrubbing Pad: A damp Magic Eraser or a non-abrasive scrubbing pad can effectively remove sticky or scorched areas. Apply gentle, firm pressure, avoiding harsh scrubbing that could damage the finish.
“The soleplate is your press’s primary point of contact with fabrics, so maintaining its pristine condition is non-negotiable. Different materials, like non-stick coatings or stainless steel, demand specific care to prevent damage. Always choose the gentlest method first.” – Sarah Jenkins, Home Appliance Expert
- Addressing Different Soleplate Materials:
- Non-Stick Soleplates: These are delicate. Use only a damp cloth with mild dish soap or the baking soda paste method with very gentle pressure. Avoid anything abrasive.
- Stainless Steel Soleplates: A paste made from baking soda and fresh lemon juice can effectively remove stains and mineral deposits without scratching the steel. Apply, let sit, then wipe and rinse.
Clearing Clogged Steam Vents
Clogged steam vents can significantly reduce your press’s steaming performance and may cause it to spit dirty water onto your clothes.
- Preparation: Ensure the press is unplugged and cool.
- Vinegar Solution: Dip cotton swabs in a 50:50 mixture of white vinegar and distilled water.
- Clean Vents: Carefully insert the damp cotton swab into each steam vent, twisting and scrubbing gently to remove any mineral deposits or fabric lint. Replace swabs as they get dirty.
- Rinse (Optional): After cleaning, you can briefly run the steam function with plain distilled water (as described in descaling) to flush out any loosened debris.
Descaling the Water Tank and Internal Components (Heart of the Steam)
Limescale buildup inside the water tank and steam channels is perhaps the most common and damaging issue for a steam ironing press. Regular descaling is vital to ensure consistent steam output and prolong your appliance’s life.
-
The Vinegar Descaling Method (for irons without self-descaling systems): This is a popular and effective DIY solution.
- Empty and Prepare: Ensure the water tank is empty and the press is cool.
- Create Solution: Mix equal parts white vinegar and distilled water.
- Fill Tank: Pour the vinegar solution into the water tank, filling it about halfway or to the max line.
- Heat and Steam: Plug in the press and set it to its highest steam setting. Let it heat up. Once ready, press the steam burst button repeatedly, gliding the soleplate over an old towel or directing the steam into a sink. Continue until the tank is empty. You’ll likely see mineral flakes and dirty water expelled.
- Soak (Optional for Stubborn Buildup): For significant buildup, you can let the vinegar solution sit in the tank for 15-30 minutes before heating and steaming.
- Rinse Thoroughly: Refill the tank with plain distilled water and repeat the steaming process several times until the tank is empty again. This flushes out any remaining vinegar residue and loosened scale. The steam should eventually run clear.
- Important Caution: Always check your press’s manual. If your model has a built-in self-descaling system or specific filters, using vinegar may not be recommended and could potentially damage these components. In such cases, follow the manufacturer’s prescribed descaling procedure.
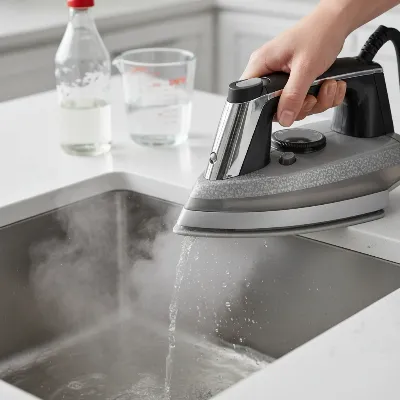 A person descaling a steam ironing press with a vinegar solution, demonstrating the process over a sink.
-
Using the Self-Cleaning Function (if available): Many modern steam ironing presses come with a self-clean button or function, making internal cleaning simpler.
- Fill Tank: Fill the water tank with plain water (distilled water is often recommended).
- Heat Up: Plug in the press and set it to the highest temperature. Allow it to heat completely.
- Activate Self-Clean: Once heated, unplug the press (or follow specific manual instructions) and hold it over a sink. Press and hold the “self-clean” or “calc-clean” button, gently shaking the press from side to side. Hot water, steam, and scale will be expelled.
- Rinse and Repeat: Continue until the tank is empty. You may need to refill with clean water and repeat to ensure all residue is flushed out.
-
Commercial Descaling Solutions: Several products are specifically designed for descaling irons and presses.
- Follow Instructions: If you opt for a commercial descaler, always follow the product’s instructions precisely, as procedures can vary. These solutions are often
Frequently Asked Questions
How often should I clean my steam ironing press?
You should clean your steam ironing press every 3 to 6 months, depending on how frequently you use it and the hardness of your tap water. Regular cleaning prevents mineral buildup and ensures optimal performance.
What household items can I use to clean an ironing press soleplate?
For soleplate cleaning, you can use a paste made from two tablespoons of baking soda and one tablespoon of distilled water. Non-gel toothpaste or a mixture of coarse salt and aluminum foil can also effectively remove sticky residue and light scorch marks.
Is it safe to use vinegar to descale my steam ironing press?
Yes, a 50:50 mixture of white vinegar and distilled water is a safe and effective descaling solution for many steam ironing presses. However, always consult your appliance's manual first, as some models with built-in self-descaling systems may not recommend vinegar.
What are the risks of not cleaning a steam ironing press regularly?
Neglecting to clean your steam ironing press can lead to clogged steam vents, reduced steam power, and the press spitting dirty water onto garments. A sticky soleplate can also damage delicate fabrics and create new wrinkles, ultimately shortening the appliance's life.
Can I use abrasive cleaners on my ironing press soleplate?
No, avoid using abrasive cleaners or harsh scrubbing pads on your ironing press soleplate, especially if it has a non-stick coating. These can scratch or damage the surface, impairing its performance. Opt for gentle methods like baking soda paste or a damp microfiber cloth.
Clean a Steam Ironing Press Safely at Home
This guide outlines the steps to safely clean your steam ironing press, including the exterior, soleplate, steam vents, and internal water tank, using common household items.
First, ensure the press is unplugged and completely cool. Lightly dampen a soft cloth with warm water and a few drops of mild dish soap, then wipe down all exterior surfaces. Use a cotton swab for crevices and dry thoroughly with a clean microfiber cloth.
For light stains, wipe the cool soleplate with a damp cloth and white vinegar. For stubborn residue, create a paste with two tablespoons of baking soda and one tablespoon of distilled water, apply it to the cool soleplate, let it sit, then gently scrub and wipe clean. Always choose the gentlest method first based on your soleplate material.
With the press unplugged and cool, dip cotton swabs into a 50:50 mixture of white vinegar and distilled water. Carefully insert the damp swab into each steam vent, twisting gently to remove mineral deposits or lint. Replace swabs as needed until the vents are clear.
Empty the water tank and fill it halfway with a 50:50 solution of white vinegar and distilled water. Heat the press to its highest steam setting, then repeatedly press the steam burst button over an old towel or sink until the tank is empty. Rinse thoroughly by repeating the process with plain distilled water until the steam runs clear. Always check your manual for specific descaling instructions.

I used to dread cleaning my ironing press, but the tip about using a 50:50 white vinegar and distilled water solution for descaling the water tank was a game-changer. It’s so simple and effective! My press is working like new again, and I’m not worried about mineral buildup anymore. Definitely recommend this method for anyone with hard water.
The baking soda paste for the soleplate worked okay, but I found it a bit messy to apply and wipe off. It did get rid of some of the gunk, but I had to go over it a few times. I wish there was an easier way to get into all the little crevices without so much scrubbing. Still, it’s better than nothing for those stubborn spots.
My ironing press is essential for my small home-based sewing business, and keeping it clean is crucial. I’ve been following the advice to clean it every 3-6 months, depending on how much I use it, and it’s made a huge difference. No more fabric stains from a dirty soleplate, and the steam is always consistent. This really helps me maintain the quality of my finished products.
I appreciate the reminder about clearing the steam vents with cotton swabs. I always forget about those! My press was starting to get a bit sluggish with its steam output, and after a quick clean of the vents, it’s back to full power. It’s a small detail but makes a big difference in performance. This routine maintenance really does extend the appliance’s lifespan.